
cursor
B l u m i l
Blumil GO Blumil Sport

Power assist

How to install Blumil GO and Blumil Sport on your Trigo or V500 wheelchair, step by step.
  • Power assist for manual wheelchairs
  • Scroll
  • Installation manual 2026-07
How to install Blumil on your wheelchair

Blumil installation guide

Blumil can be connected to a foldable wheelchair using the removable mounting bar. The only parts that are permanently added to the wheelchair are the receivers for the mounting bar.

Blumil GO next to a foldable Vermeiren wheelchair, disconnected, side view

These installation instructions are intended for the specialist dealer. Pictures of the product are used to clarify the instructions; details of the depicted product may deviate from your product.

Blumil Sport next to a foldable Vermeiren wheelchair, disconnected, side view

Scope of delivery

  • Blumil device for foldable wheelchairs
  • Mounting bar
  • Manual

Compatible wheelchairs

  • Trigo S, Trigo T Trigo receiver
  • V500 Light, V500 Light 30°, V500 Active V-series receiver

Before you start

Check that everything is included and that no products are damaged.

Different types of receivers are available, depending on the wheelchair frame. Make sure to use the correct type for your wheelchair.

The basic configuration may differ in different European countries. Contact your specialist dealer.

Step by step

Detailed installation steps

Every step below follows the installation manual (2026-07). The blue numbers refer to the parts in the manual drawings; the photos come from the tutorial videos.

Your wheelchair

The receivers and the tutorial video differ per wheelchair frame. Part 2 is identical for both.

1

Installing the mounting bar receivers Trigo S · Trigo TV500 Light · Light 30° · Active

Different types of receivers are available, depending on the wheelchair frame. Make sure to use the correct type for your wheelchair.

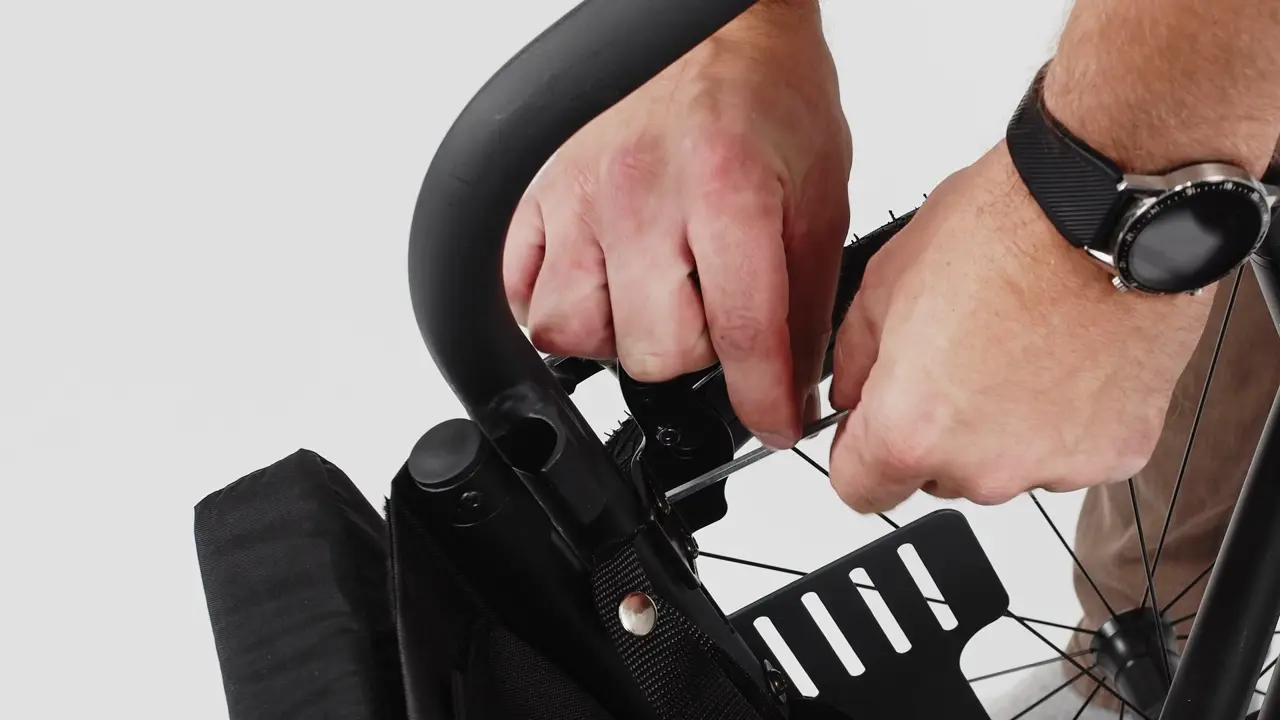
Trigo S · Trigo T: If the Blumil receiver interferes with the standard brake position, the brakes need to be repositioned to the optional brake adapter plates. Remove the brake first and mount the adapter plate on the receiver — see part 3.
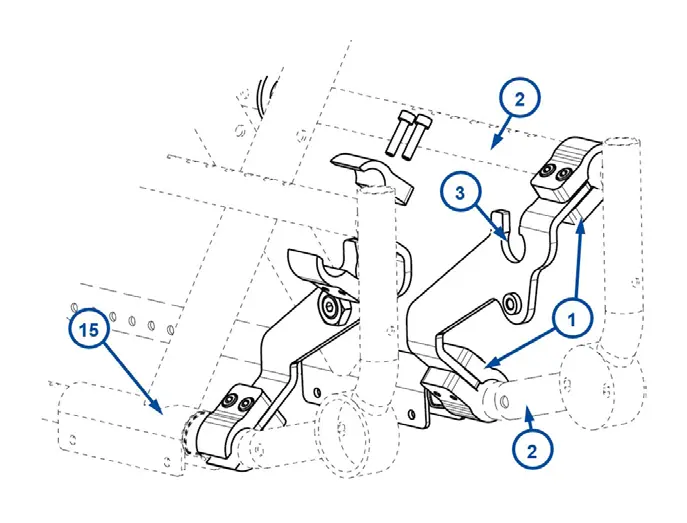
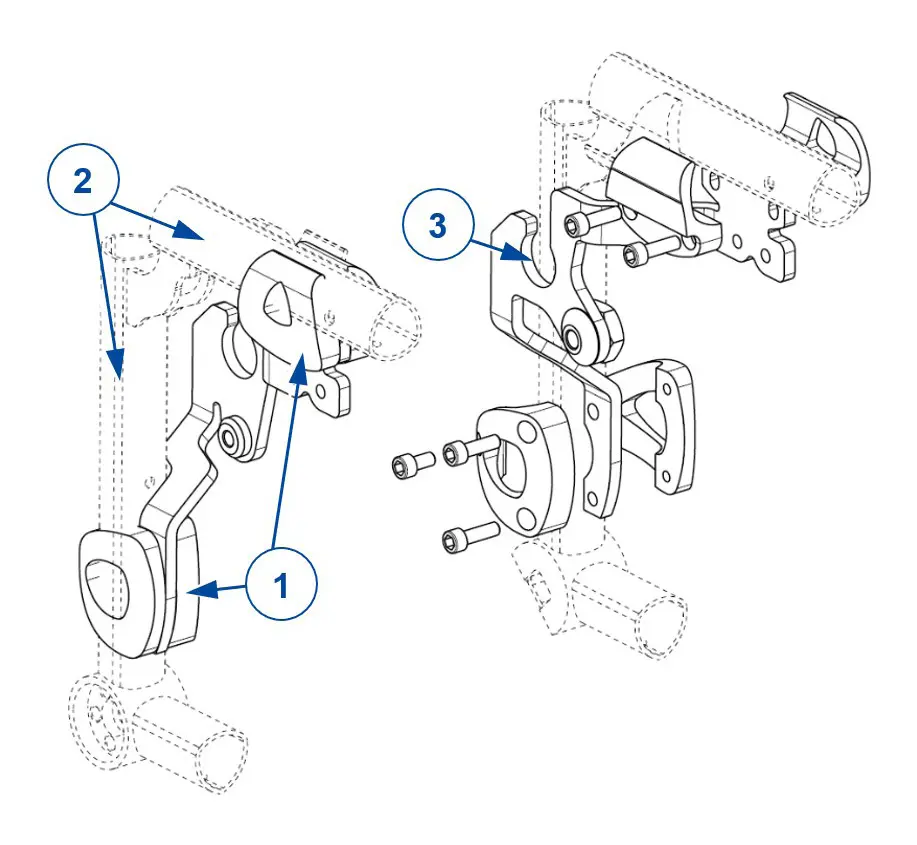
Trigo receiver: clamps 1 over the frame tubes 2, slit 3 pointing upwards
Manual §2.1.1
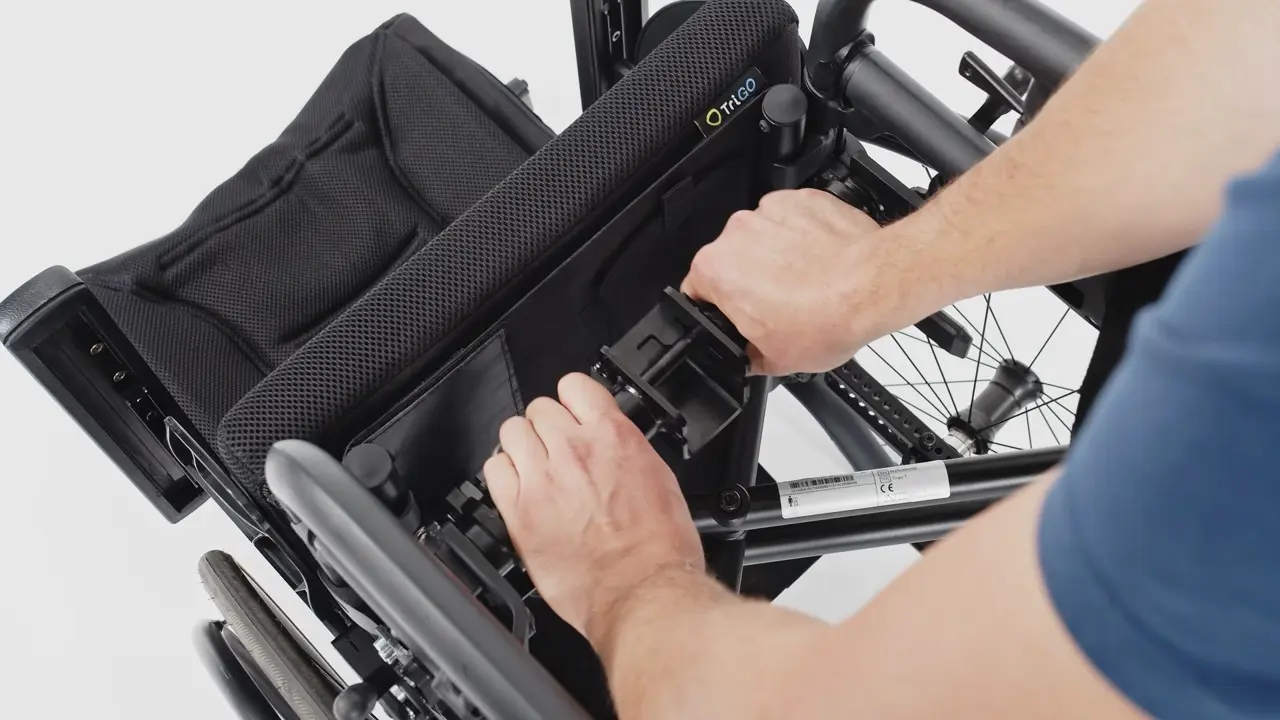
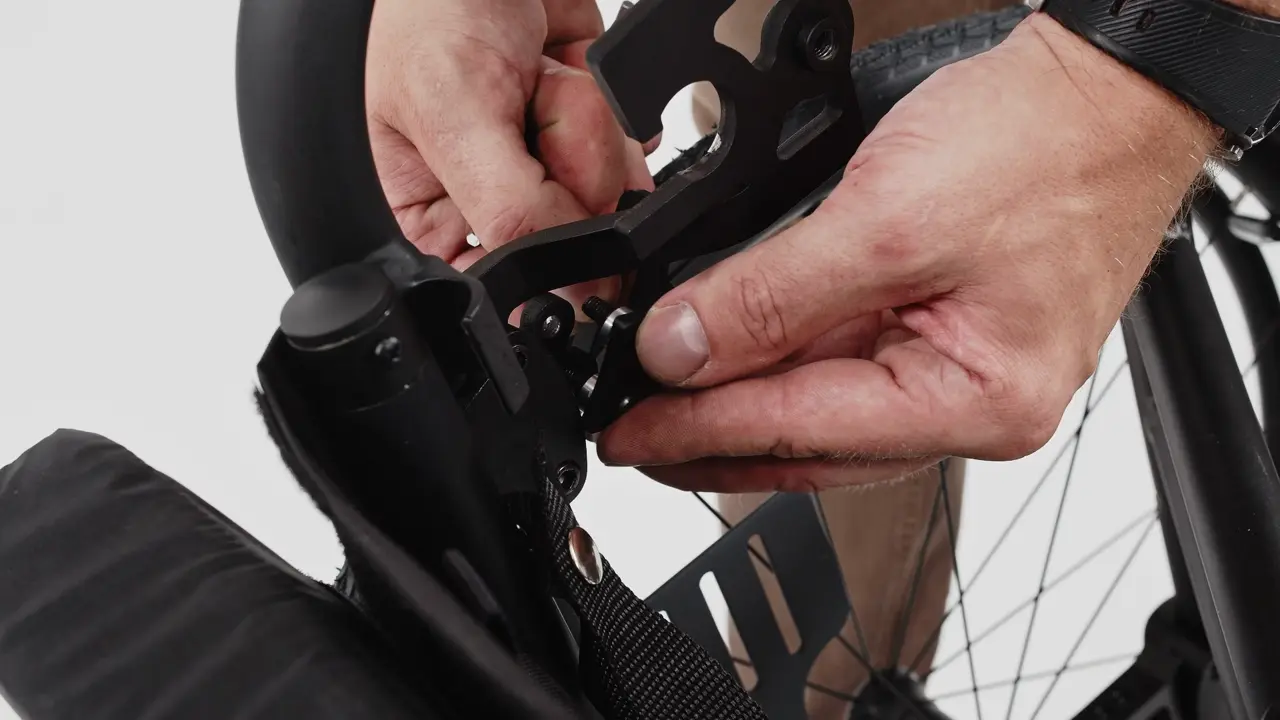
Mounting the receiver clamp on a Trigo frame tube
Video · 0:30
Part 1 · Steps 1–3

Place the receivers on the frame

  1. Place the clamps 1 of the receiver over the frame tubes 2 of the wheelchair (one below the seat, one to the front frame tube). Ensure that the receiver is bending inwards. The slit 3 for the mounting bar needs to be oriented upwards.
  2. Slightly tighten all screws on the clamps so the receiver remains in place.
  3. Repeat for the other side.
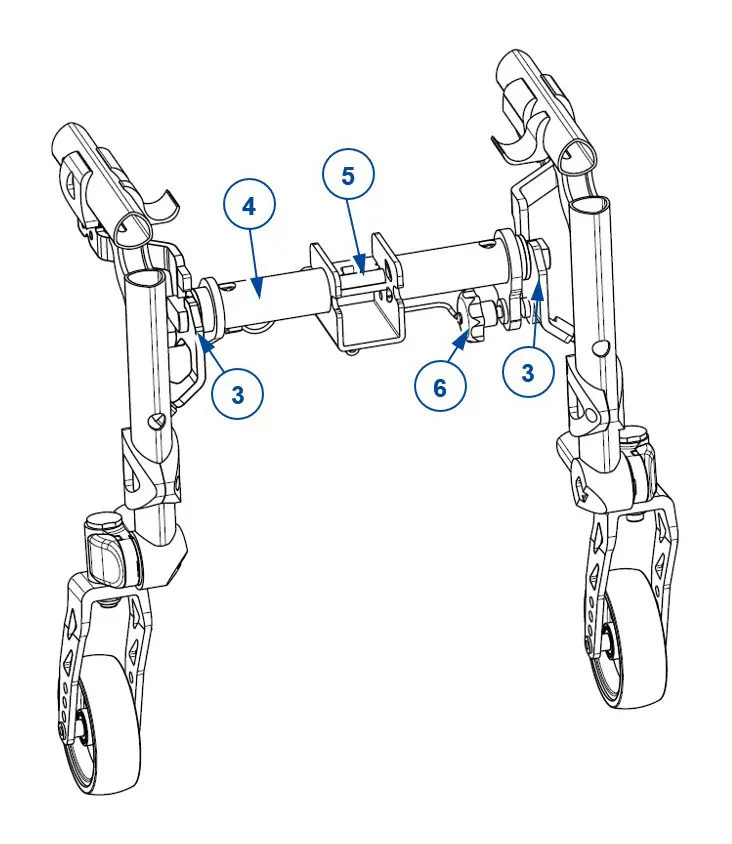
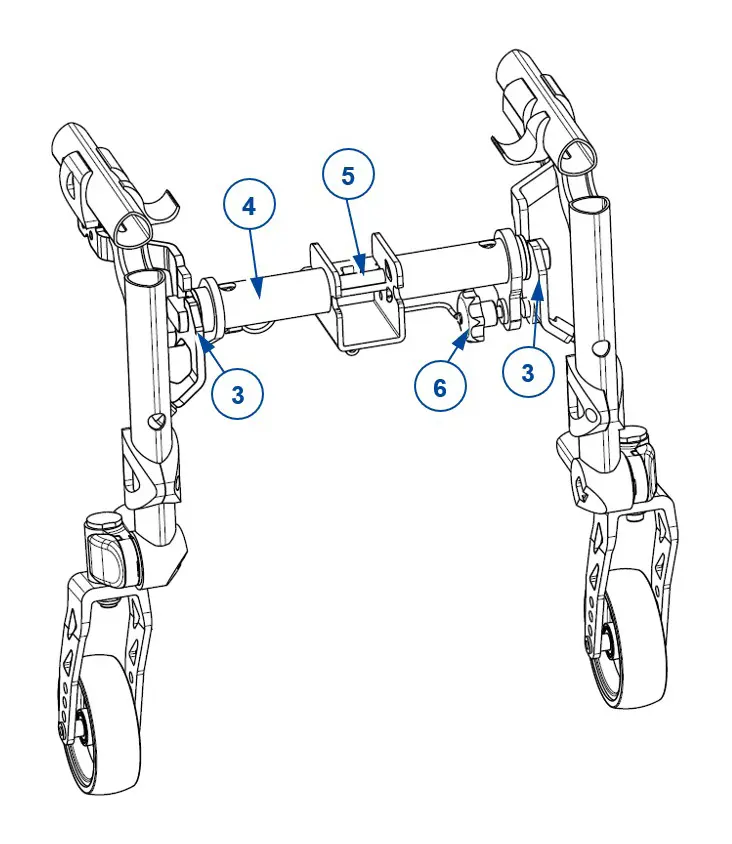
Mounting bar 4 inserted into the slits 3, Blumil connection point 5 to the front, star knob 6
Manual §2.1.1
Inserting the mounting bar into the receivers of a Trigo wheelchair
Video · 1:26
Part 1 · Steps 4–6

Insert the mounting bar and secure the clamps

  1. Insert the mounting bar 4 into the slits 3, and rotate to click into place. Make sure that the bar is oriented with the Blumil connection point 5 to the front.
  2. Tighten the star knob 6 by hand.
  3. Firmly tighten all screws to secure the clamps into place.
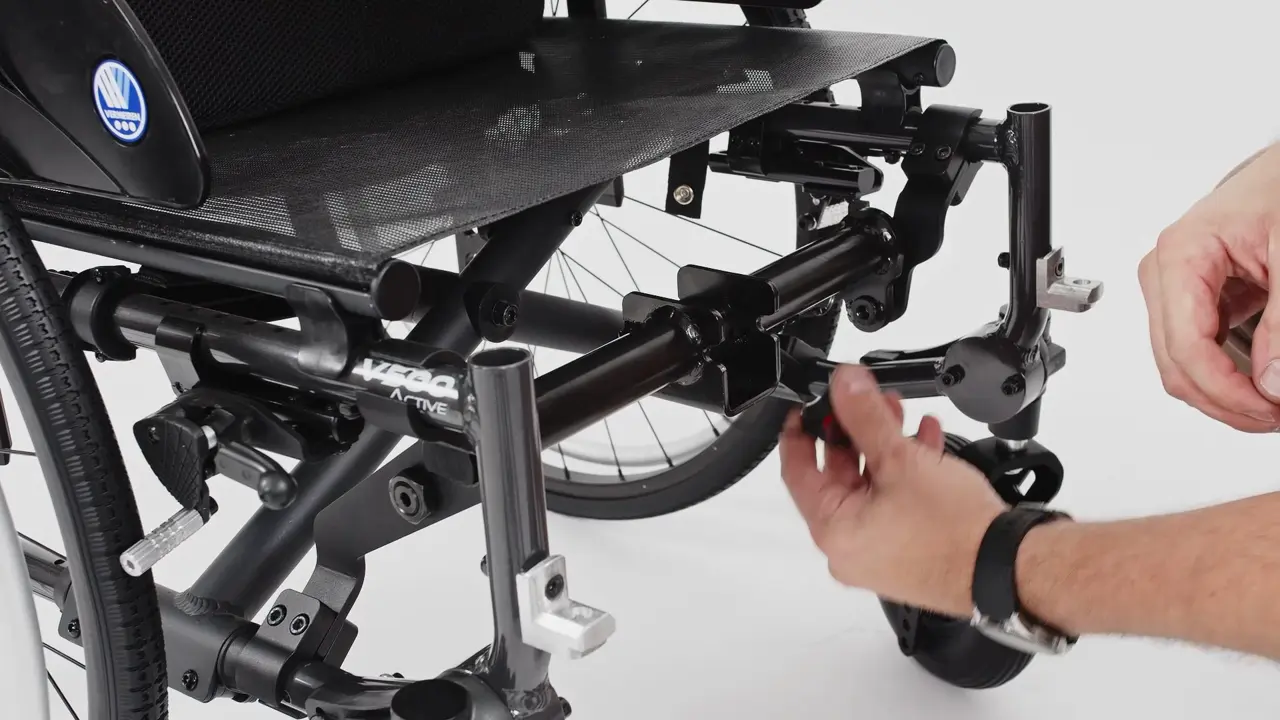
V-series receiver: clamps 1 over the frame tubes 2, lower clamp against the plastic cross attachment 15, slit 3 upwards
Manual §2.1.2
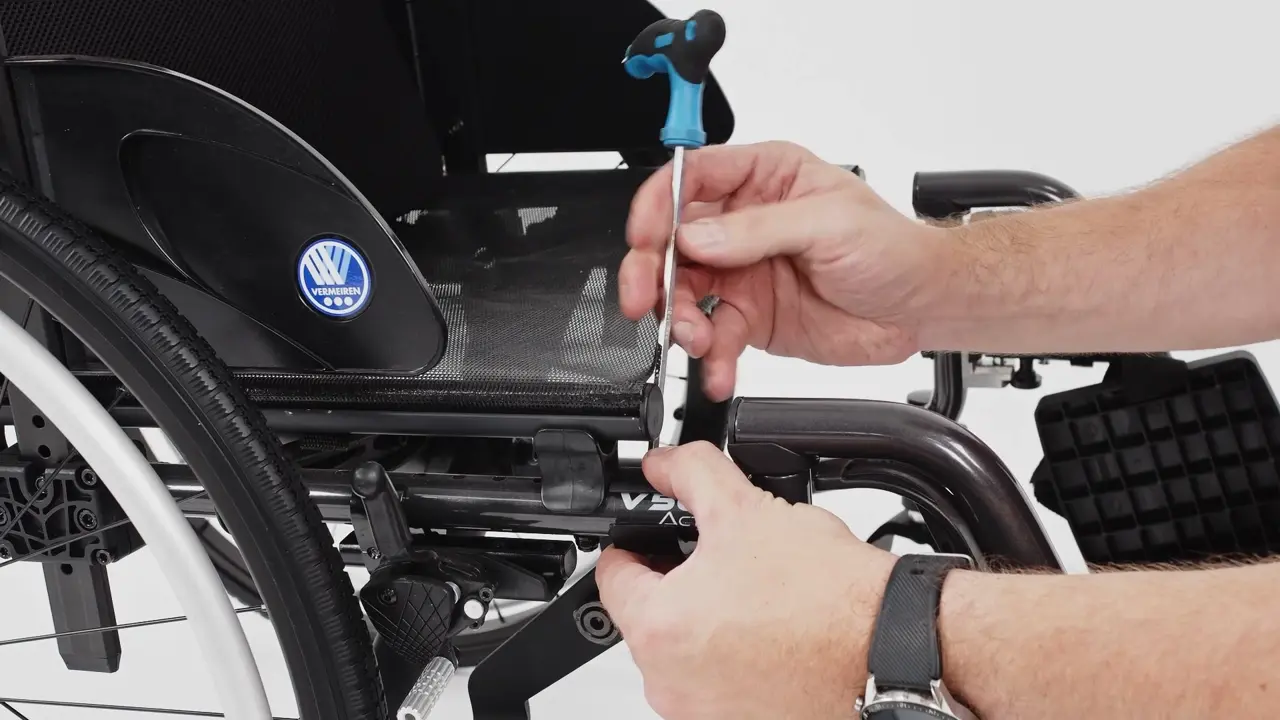
Mounting the receiver clamp on a V500 Active frame
Video · 0:06
Part 1 · Steps 1–3

Place the receivers on the frame

  1. Place the clamps 1 of the receiver over the frame tubes 2 of the wheelchair (one below the seat, one to the lower frame tube). Ensure that the lower clamp is placed against the plastic cross attachment 15 on the lower frame tube. Ensure that the receiver is bending inwards. The slit 3 for the mounting bar needs to be oriented upwards.
  2. Slightly tighten all screws on the clamps so the receiver remains in place.
  3. Repeat for the other side.
Mounting bar 4 inserted into the slits 3, Blumil connection point 5 to the front, star knob 6
Manual §2.1.2
Inserting the mounting bar into the receivers of a V500 wheelchair
Video · 0:21
Part 1 · Steps 4–6

Insert the mounting bar and secure the clamps

  1. Insert the mounting bar 4 into the slits 3, and rotate to click into place. Make sure that the bar is oriented with the Blumil connection point 5 to the front.
  2. Tighten the star knob 6 by hand.
  3. Firmly tighten all screws to secure the clamps into place.
2

Adjusting the Blumil receiver to your wheelchair Blumil GO · Blumil Sport

To adjust the height and angle of the Blumil connection.

Blumil Sport: make sure to mount the standing support before adjustment.
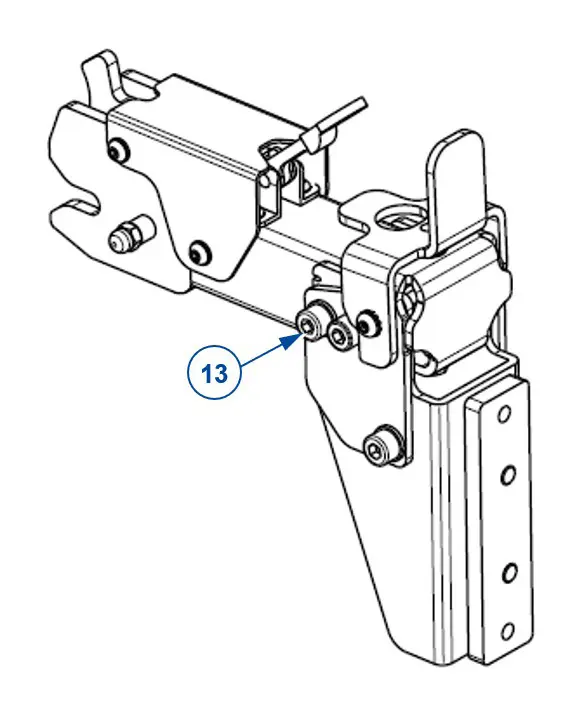
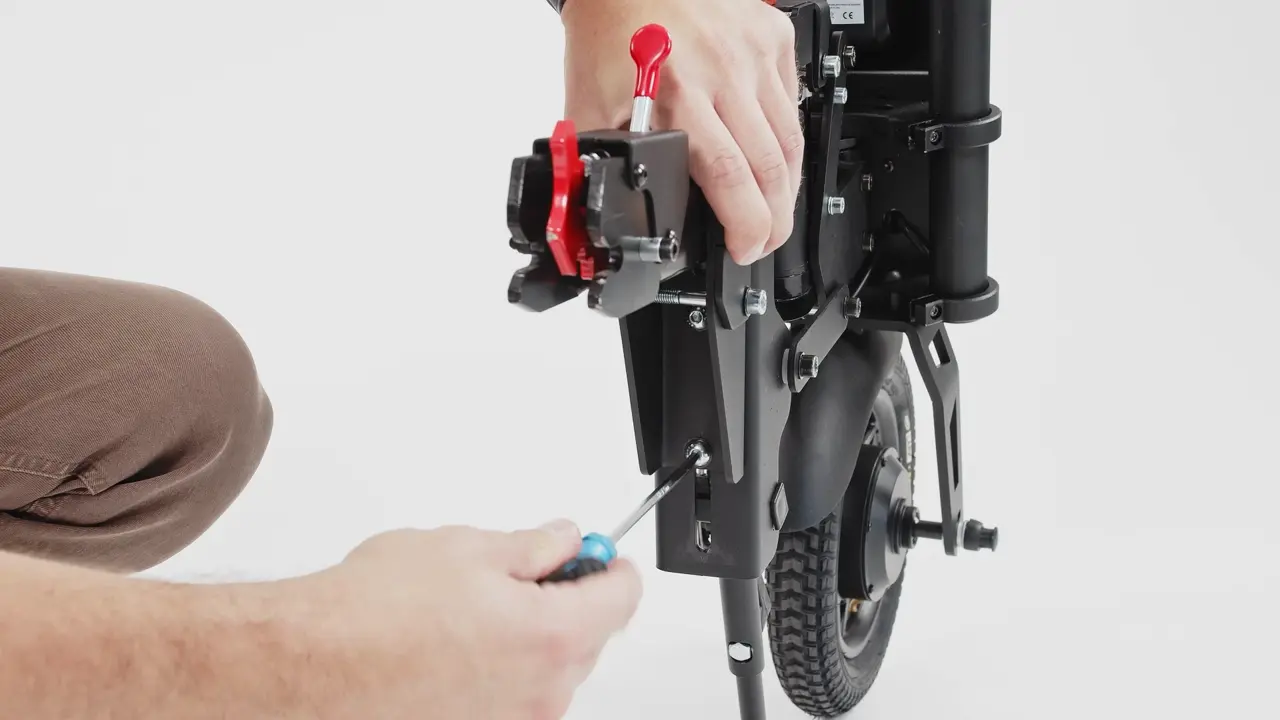
Bolt-nut connection 13 on the Blumil connection
Manual §2.2
Loosening the bolt-nut connection on the Blumil connection
Video · 1:44
Video · 0:54
Part 2 · Step 1

Loosen the adjustment system

  1. Slightly loosen the bolt-nut connection 13 to adjust the Blumil connection.
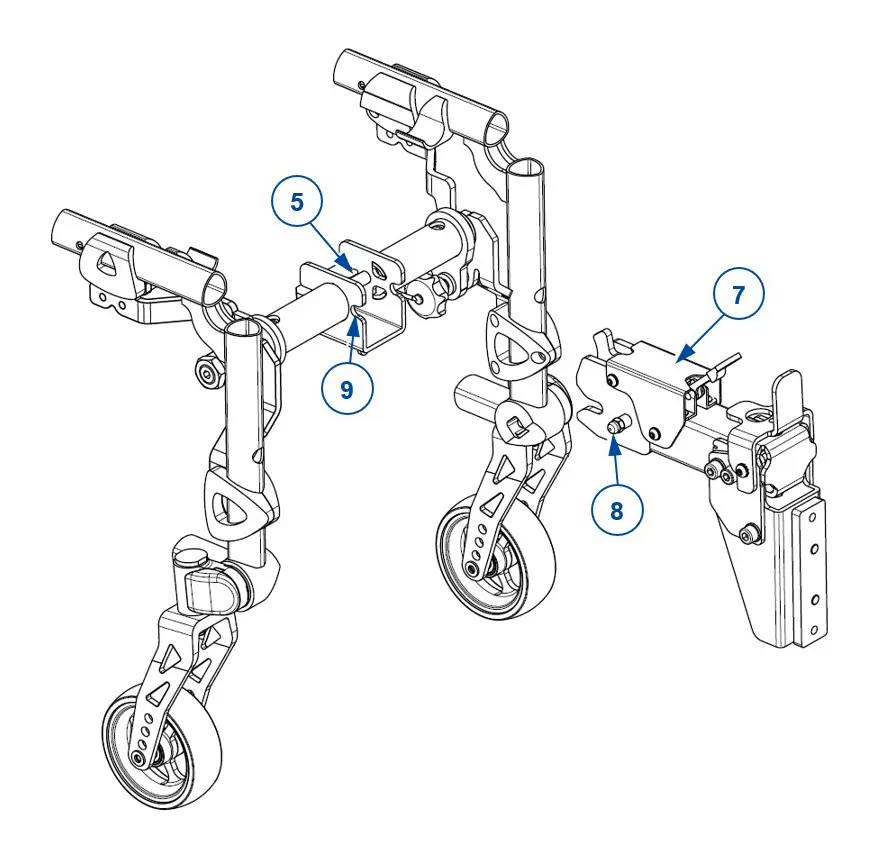
Slide the Blumil connection 7 to the height of the connection point 5; pin 8 clicks into slot 9
Manual §2.2
Sliding the Blumil connection to the right height
Video · 1:47
Video · 0:57
Part 2 · Steps 2–3

Set the height and check the angle

  1. Slide the Blumil connection 7 to a height that corresponds to the Blumil connection point 5 on the mounting bar.
  2. Try to click the connection into the connection point to check the angle. You should be able to smoothly click the pin 8 of the Blumil connection into the slot 9 of the Blumil connection point.
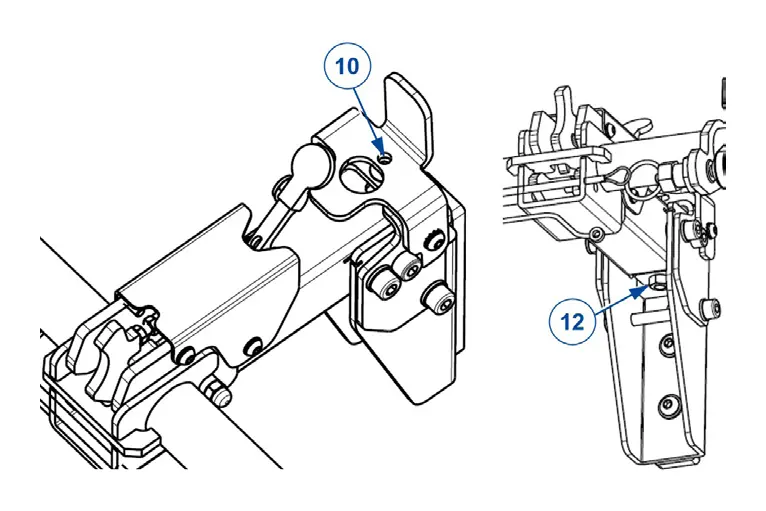
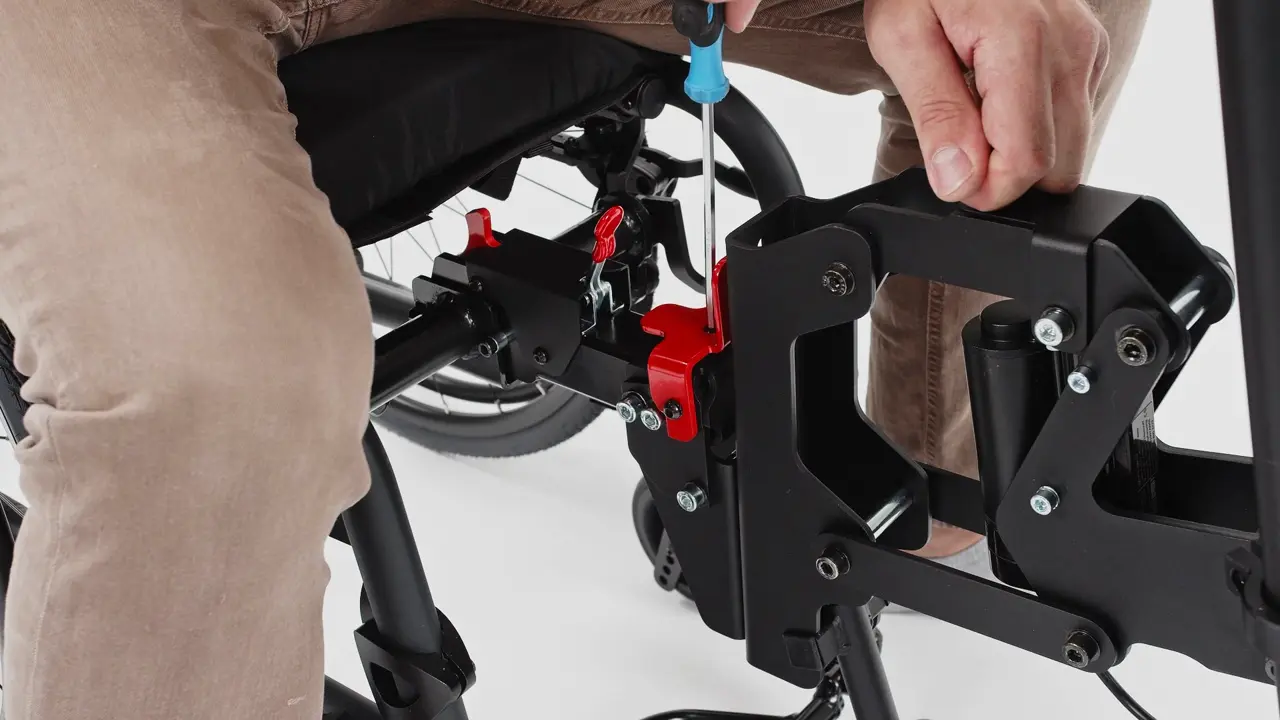
Top screw 10 adjusts the angle; nut 12 at the bottom of the screw
Manual §2.2
Adjusting the angle of the Blumil connection while connected to the wheelchair
Video · 1:54
Video · 1:06
Part 2 · Step 4

Adjust the angle if necessary

  1. If necessary, adjust the angle of the connection by turning the top screw 10. Make sure that the nut 12 on the bottom of the screw is loosened first.
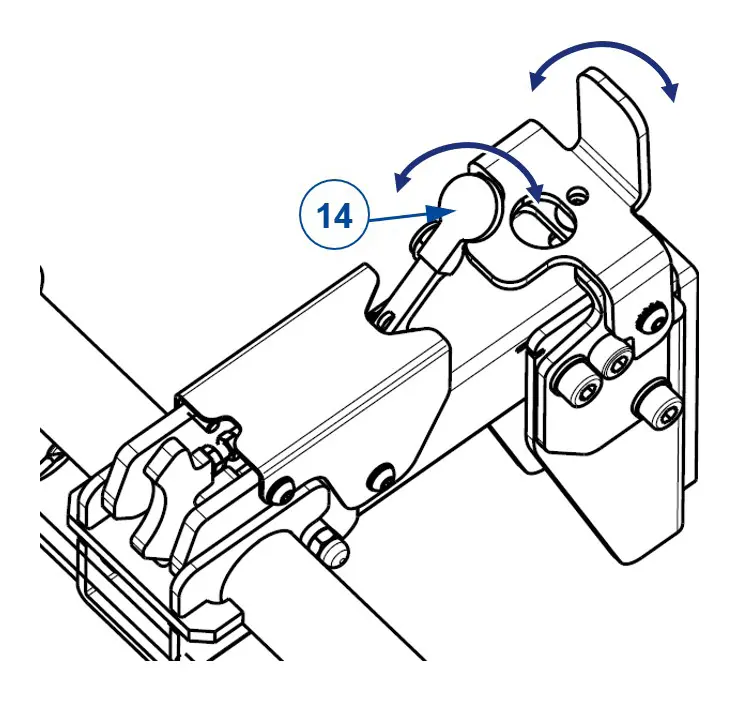
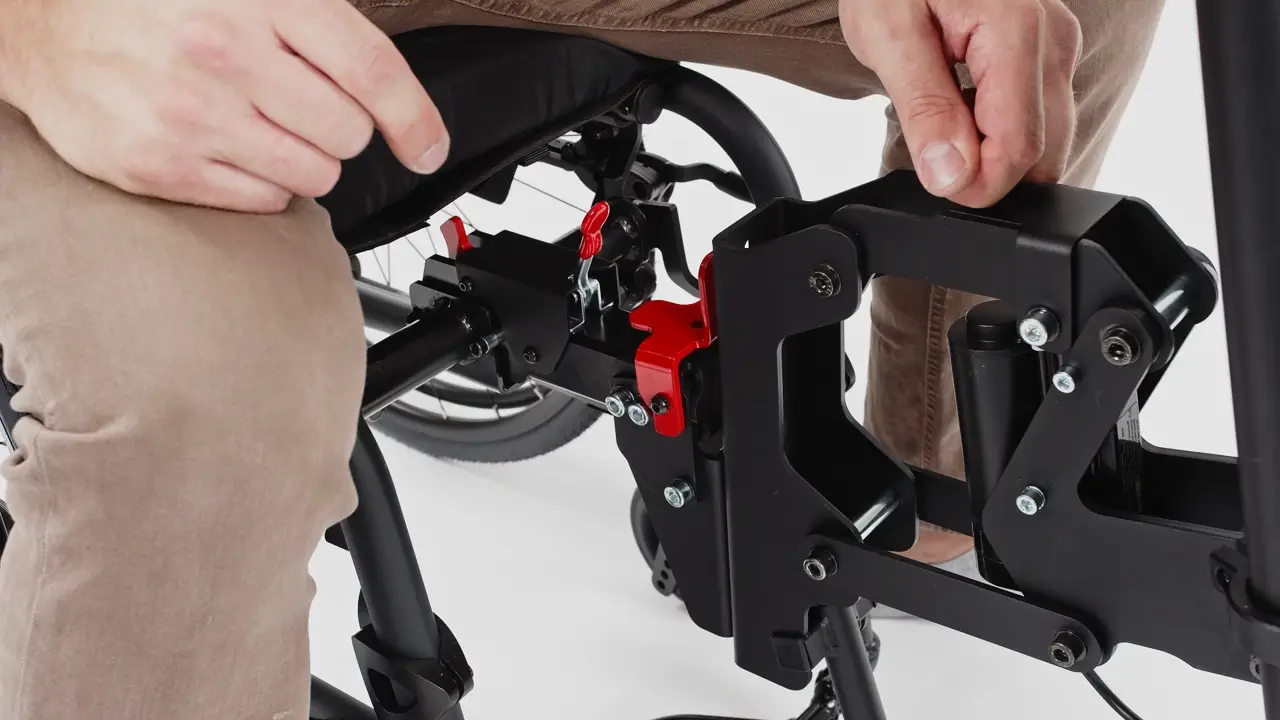
Locking lever 14 on the Blumil connection
Manual §2.2
Testing the red locking lever of the Blumil connection
Video · 2:02
Video · 1:12
Part 2 · Steps 5–6

Test the locking lever

  1. Once the connection smoothly clicks into the connection point, try out the locking lever 14 to ensure that it works well.
  2. If the red safety lever easily opens again with a flick of your thumb, and the connection easily slides back out of the connection point, you have determined the correct settings.
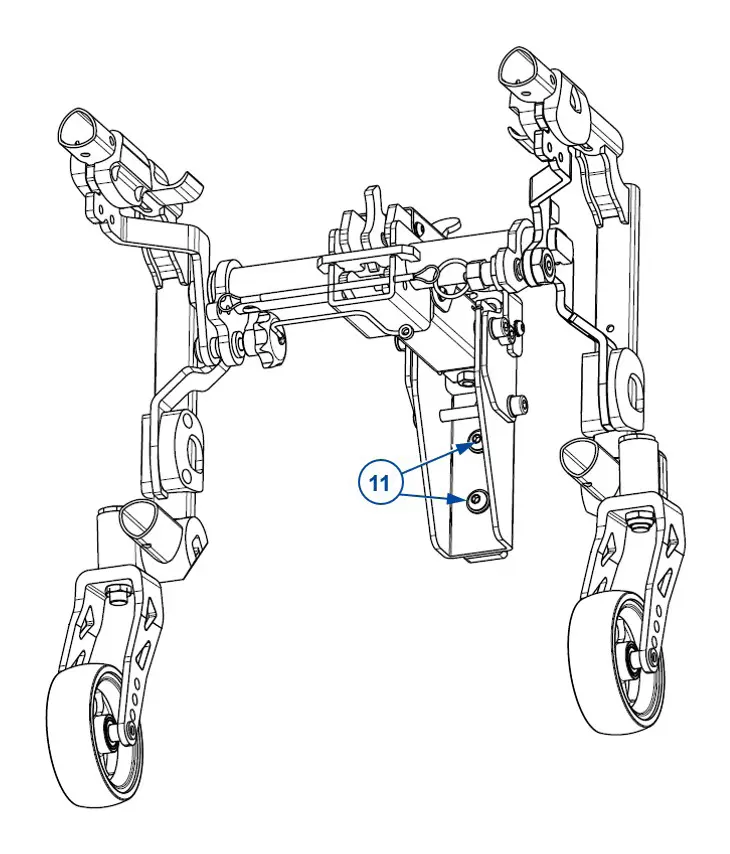
The 2 screws 11 on the inner side of the Blumil connection secure the height
Manual §2.2
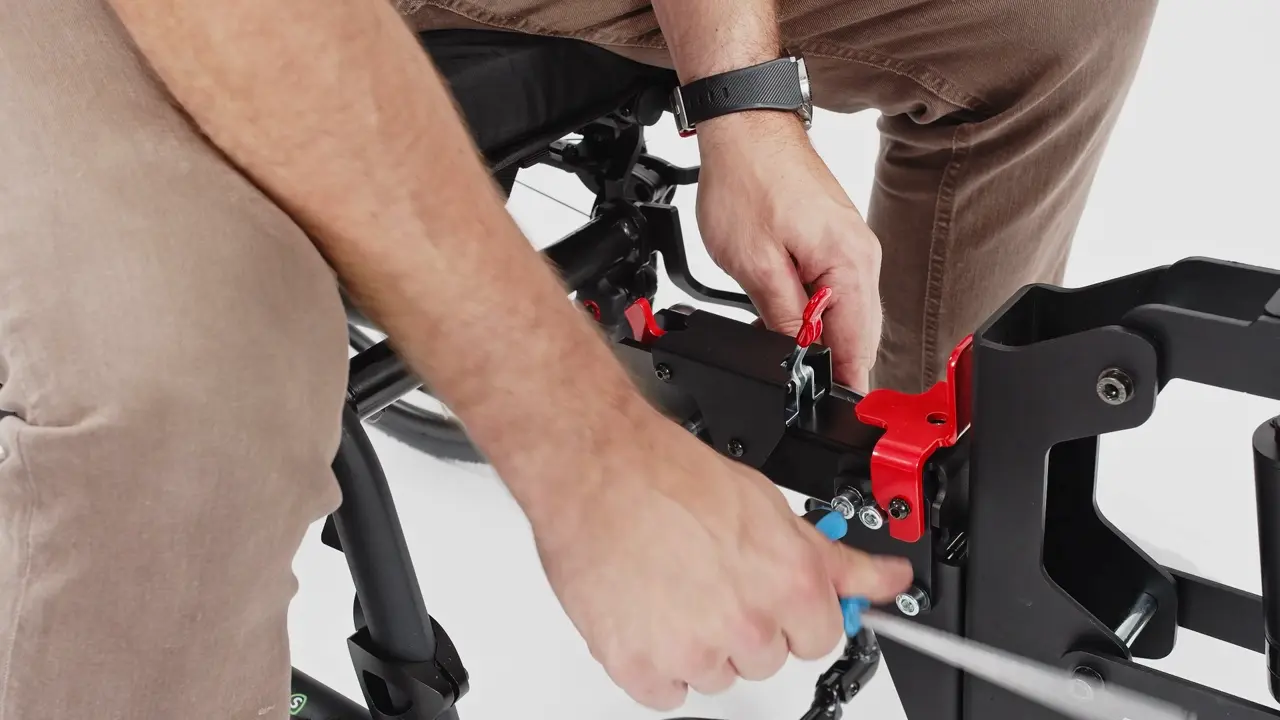
Tightening the screws of the Blumil connection with the Blumil still connected
Video · 2:06
Video · 1:15
Part 2 · Steps 7–8

Secure the height

  1. With Blumil still connected to the wheelchair, firmly secure the height adjustment by tightening the 2 screws 11 on the inner side of the Blumil connection.
  2. Remove Blumil a bit from the wheelchair again.
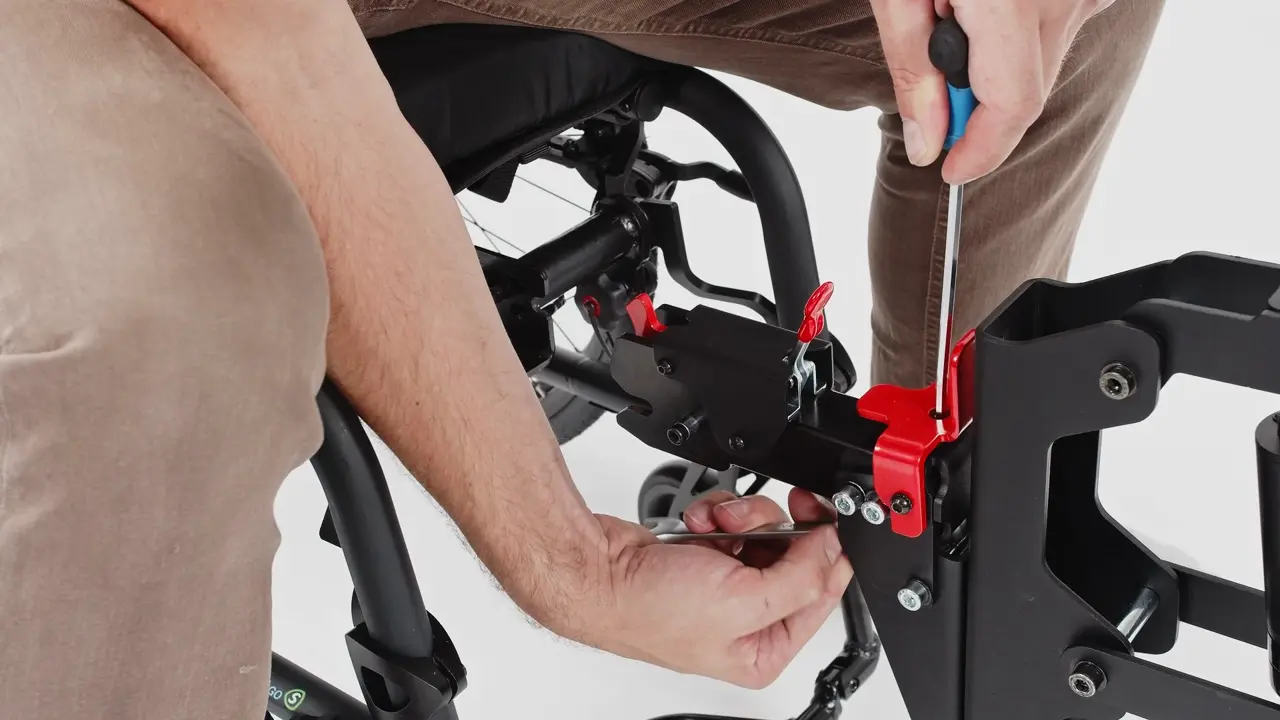
Nut 12 on the bottom of screw 10 secures the angle
Manual §2.2
Securing the angle adjustment of the Blumil connection
Video · 2:09
Video · 1:18
Part 2 · Step 9

Secure the angle

  1. Firmly secure the angle adjustment by tightening the nut 12 on the bottom of screw 10. Use the Allen key to prevent the screw from turning while tightening the nut.
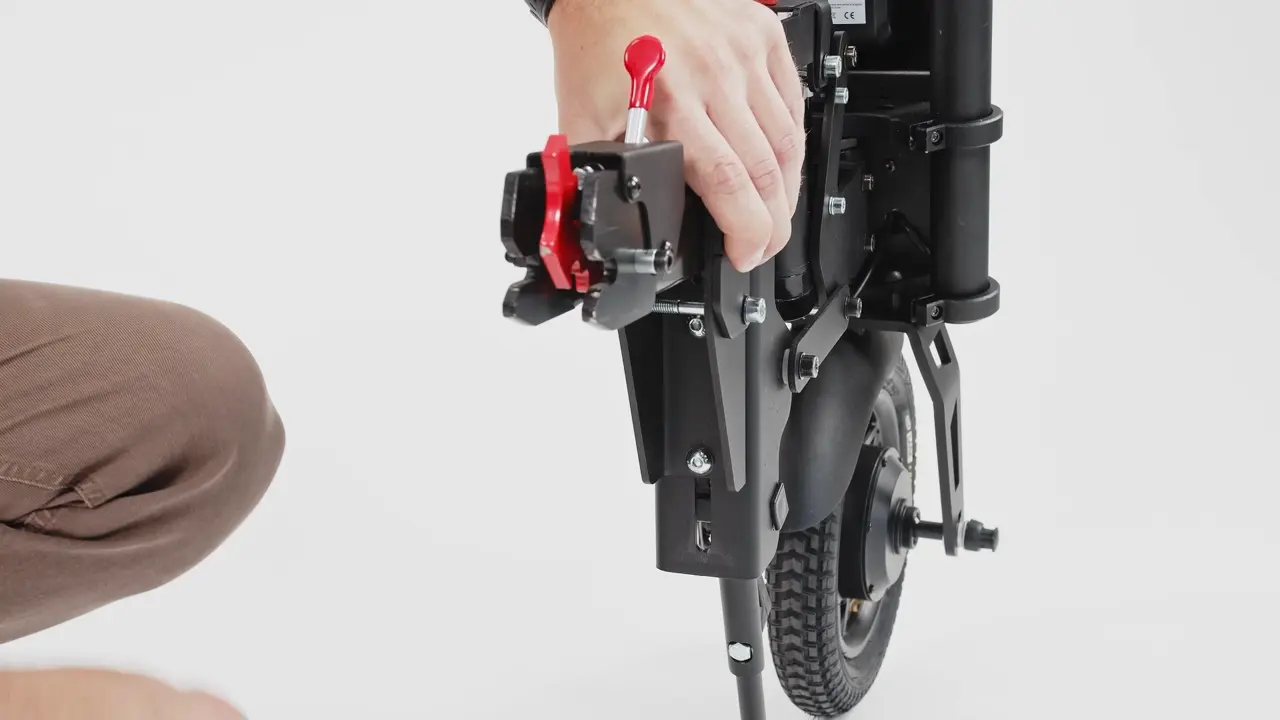
Bolt-nut connection 13 secures the whole adjustment system
Manual §2.2
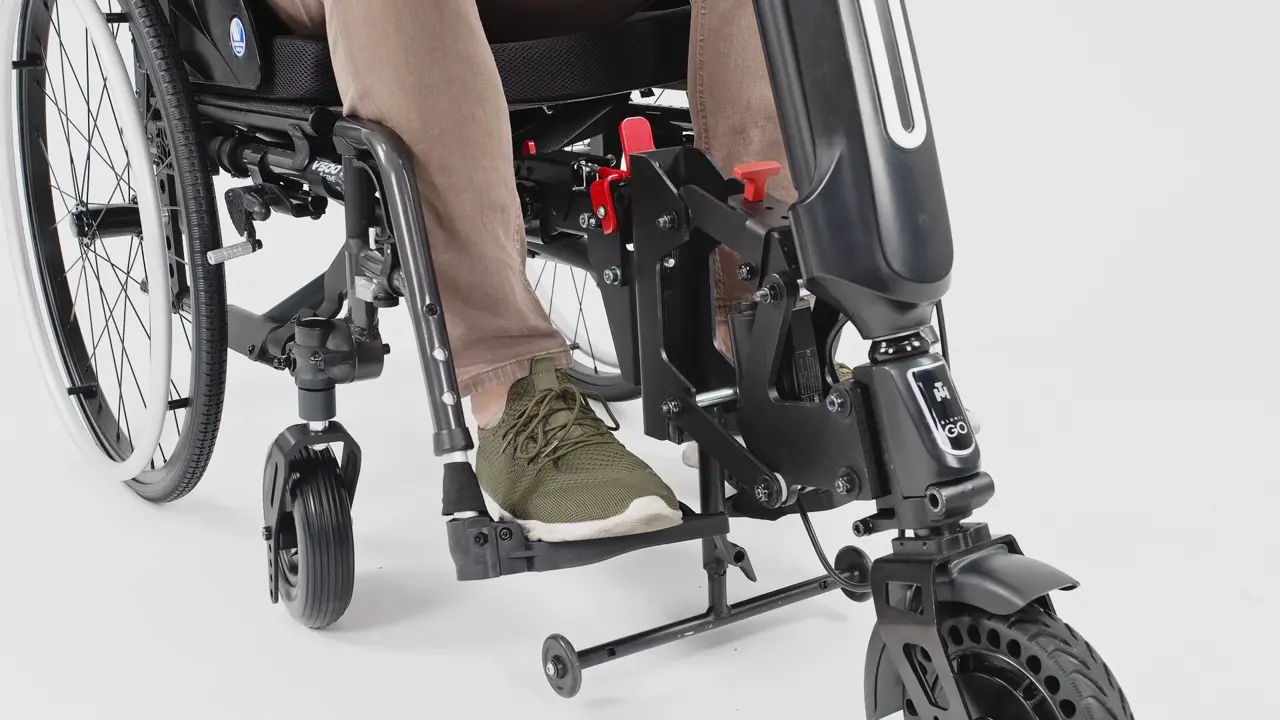
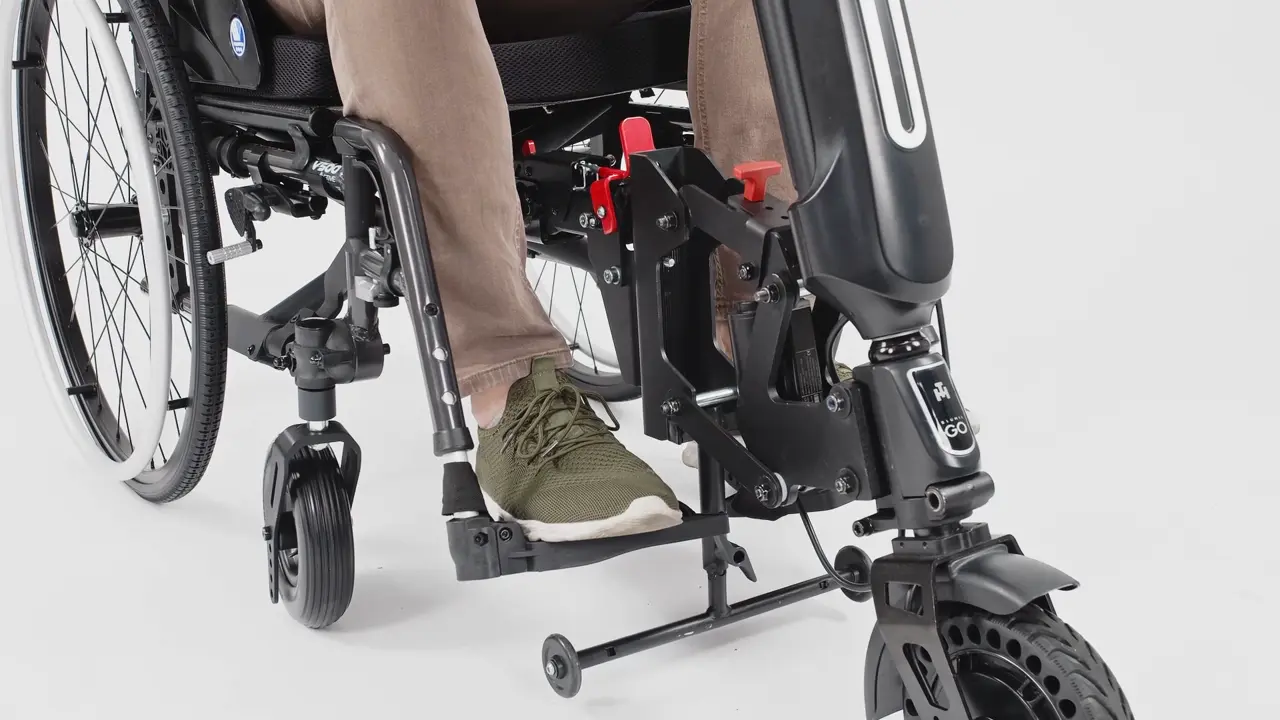
Blumil connected to the wheelchair after the installationBlumil connected to the V500 wheelchair after the installation
Video · 2:12
Video · 1:24
Part 2 · Step 10

Tighten the bolt-nut connection

  1. Firmly tighten the bolt-nut connection 13 to secure the whole adjustment system.
3

Brake adapter plate Trigo S · Trigo T only

If the Blumil receiver interferes with the standard brake position, the brakes need to be repositioned to the optional brake adapter plates.

Not applicable to the V-series. The brake adapter plate is only described for Trigo S and Trigo T. You have selected V-series above; the steps are shown for reference.
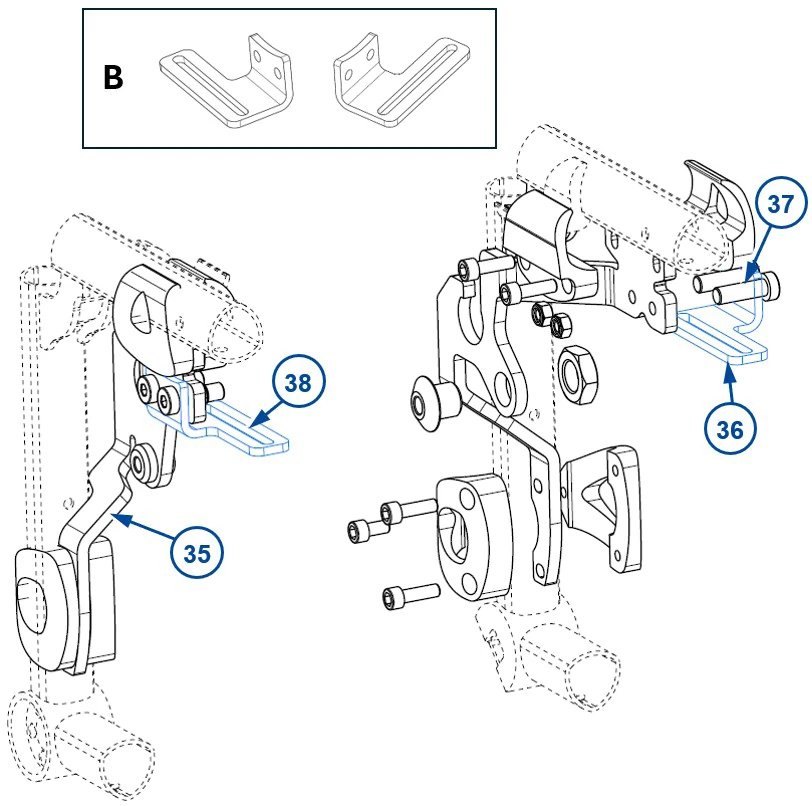
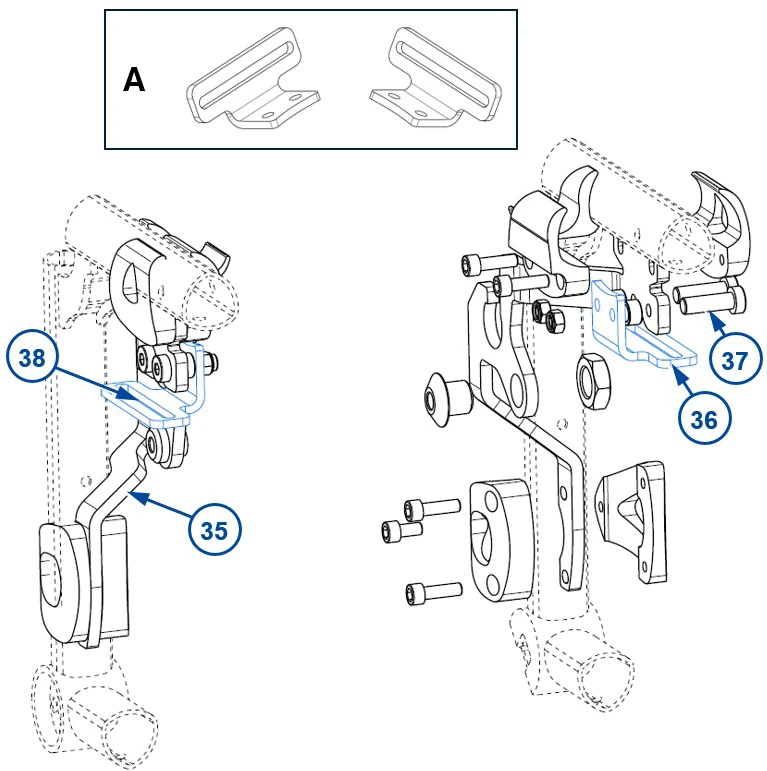
Brake adapter plate A
Manual §2.3 · A

Adapter plate A can be taken as standard.

Brake adapter plate B
Manual §2.3 · B

Adapter plate B can be used in configurations where adapter plate A is insufficient for correct brake placement due to rear wheel camber, rear wheel position, ...

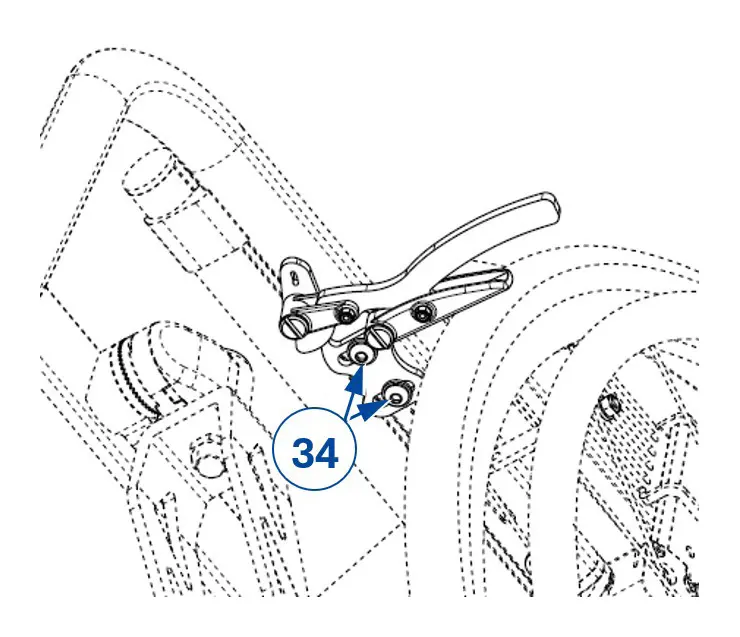
Both screws 34 of the brake on the Trigo frame
Manual §2.3
Removing the brake from the Trigo wheelchair frame
Video · 0:16
Part 3 · Step 1

Remove the brake

  1. Remove both screws 34 and take the brake with attachment off the wheelchair frame.
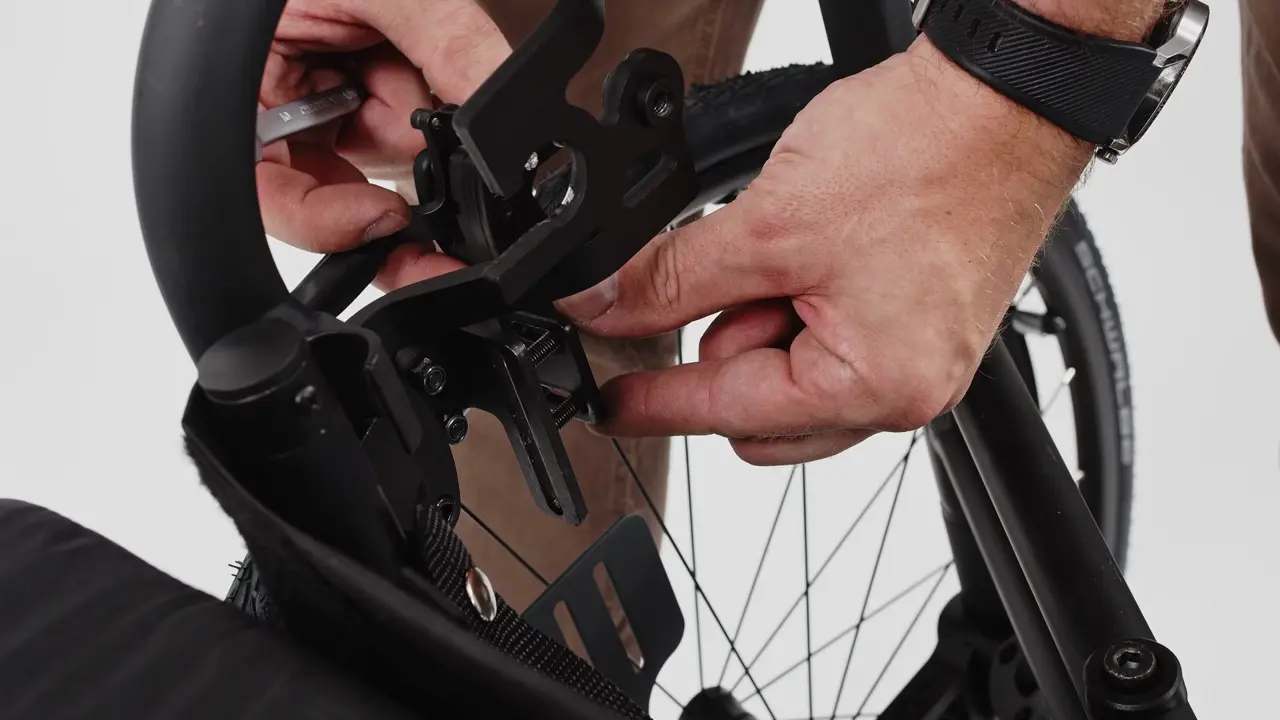
Receiver 35, brake adapter plate 36, bolt-nut connections 37 and brake slot 38
Manual §2.3
Mounting the brake adapter plate to the receiver
Video · 1:06
Part 3 · Steps 2–3

Mount the receiver and the adapter plate

  1. Mount the receiver 35 as described in §2.1.1 (part 1, Trigo).
  2. Mount the brake adapter plate 36 to the receiver by inserting the bolt-nut connections 37. Tighten firmly by hand.
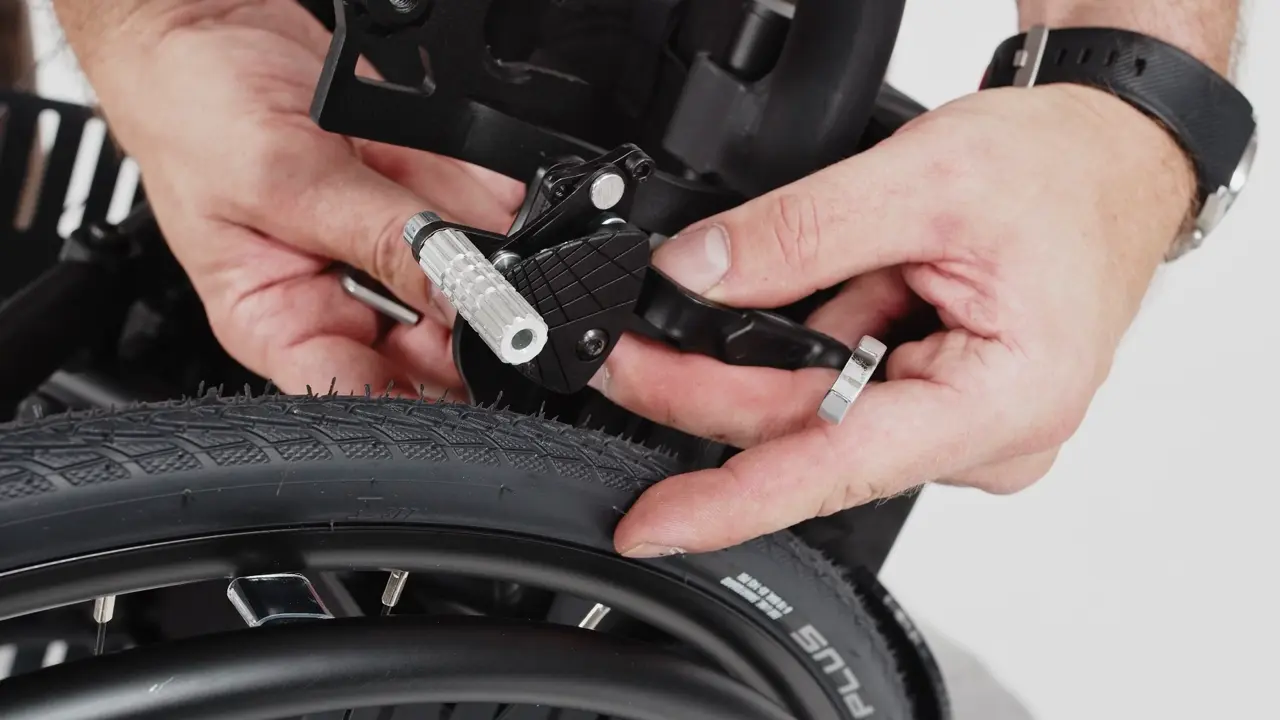
Mounting the brake into the slot of the brake adapter plate
Video · 1:18
Part 3 · Steps 4–6

Refit and adjust the brake

  1. Mount the brake into the slot 38 of the brake adapter plate. Tighten the screws 34 firmly by hand.
  2. If necessary, adjust the brake by sliding it forward/backward in the slot.
  3. Repeat for the other side.
Video

Tutorials

Three tutorial films: the complete installation on a Trigo, on a V500, and how Blumil connects to the wheelchair. Click a film to play it full screen.

Installation on Trigo

(Tutorial · 2:23)

Installation on V500

(Tutorial · 1:36)

Connecting Blumil to the wheelchair

(Tutorial · 0:32)

Discover Blumil

Blumil GO — foldable power assist for manual wheelchairs. Blumil Sport — power assist for manual wheelchairs.

Blumil GO — Go and explore

(Movie · 0:53)

Blumil Sport — Ultimate adventure

(Movie · 1:00)
Pay attention to

Tips and important information

The points the installation manual singles out. They are repeated here so nothing gets missed while you work through the steps.

Use the right receiver

Different types of receivers are available, depending on the wheelchair frame. Make sure to use the correct type for your wheelchair: Trigo S and Trigo T, or V500 Light, V500 Light 30° and V500 Active.

Manual §2.1

Receiver orientation

Ensure that the receiver is bending inwards and that the slit 3 for the mounting bar is oriented upwards. On the V-series, the lower clamp sits against the plastic cross attachment 15.

Manual §2.1.1 · §2.1.2

Connection point to the front

When you insert the mounting bar, make sure it is oriented with the Blumil connection point 5 to the front, then tighten the star knob 6 by hand.

Manual §2.1

Blumil Sport: standing support first

Make sure to mount the standing support before adjustment of the Blumil connection.

Manual §2.2

Loosen the nut before turning the screw

When adjusting the angle with the top screw 10, the nut 12 on the bottom of the screw must be loosened first. When securing it again, use the Allen key to prevent the screw from turning while tightening the nut.

Manual §2.2

Brake adapter plate on Trigo

If the Blumil receiver interferes with the standard brake position, the brakes need to be repositioned to the optional brake adapter plates. Adapter plate A can be taken as standard. Remove the brake before mounting the receiver.

Manual §2.3

Configuration per country

The basic configuration may differ in different European countries. Contact your specialist dealer.

Manual §1

Pictures may differ

Pictures of the product are used to clarify the instructions. Details of the depicted product may deviate from your product.

Manual · Preface

Always the latest version

On vermeiren.com you will always find the most recent version of the information in the manual. Please consult the website regularly for possible updates. Visually impaired people can download the electronic version and have it read out by a text-to-speech application.

Manual · Preface
Final check

Is everything secured?

Run through the list before handing the wheelchair over. Each point corresponds to a step in the manual.

0 / 9 checked
All points checked. Blumil is ready to be connected to the wheelchair. Keep the installation manual with the wheelchair documentation.
Blumil GO Blumil Sport

Installed. Adjusted. Ready to go.

Keep the documentation at hand.

  • WE
  • CARE
  • FOR
  • YOUR
  • MOBILITY
Video